Oven vs. Dehydrator: The Secret to Brighter Dried Orange Slices for Stunning Garlands
The twinkling glow of a `dried orange garland` strung across a window or nestled among Christmas tree branches evokes a timeless charm. These natural, fragrant decorations have become a beloved staple for holiday seasons and year-round rustic decor. But for many DIY enthusiasts, the quest for perfectly vibrant, almost translucent orange slices can be a point of frustration. The choice between using an oven and a dehydrator isn't just about convenience; it significantly impacts the final color and longevity of your beautiful `dried orange garland`.
This comprehensive guide will delve into the nuances of each drying method, revealing how to achieve those coveted brighter orange slices that truly catch the light, transforming your homemade garlands into radiant works of art. Whether you're aiming for a rustic, warm aesthetic or a more vivid, almost stained-glass effect, understanding the pros and cons of your drying tool is key.
The Allure of Dried Orange Garlands: More Than Just Decoration
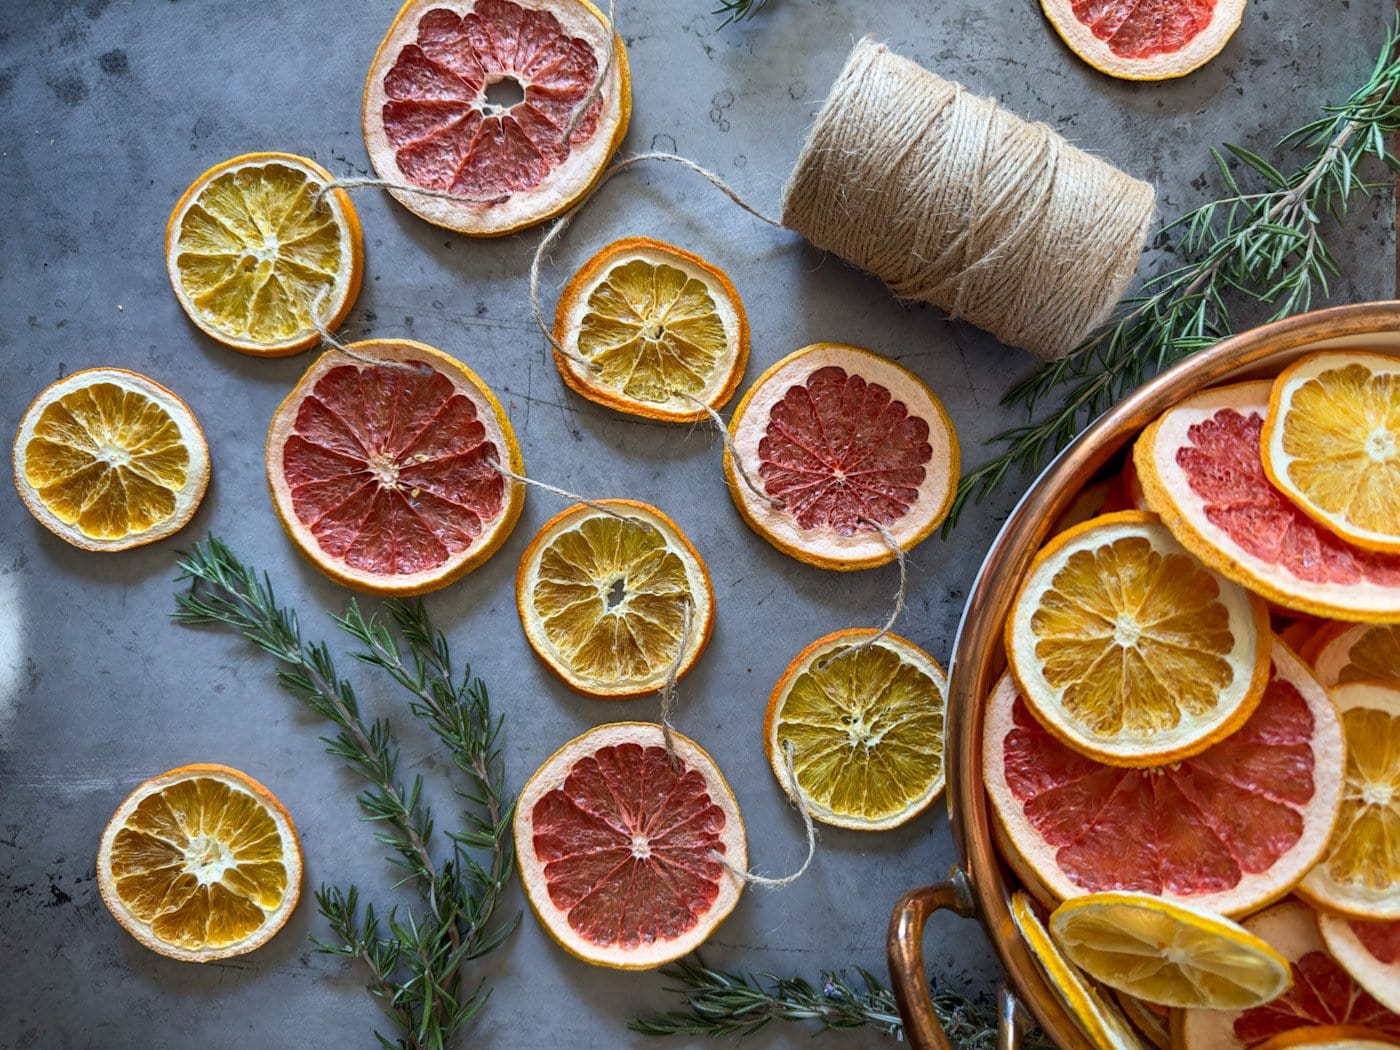
A `dried orange garland` is far more than a simple decoration; it's a sensory experience. Visually, the delicate slices, especially when dried to a brilliant hue, mimic candied stained glass, casting warm, inviting light wherever they're displayed. Imagine them adorning a sunny window, shimmering on a Christmas tree alongside festive lights, or gracing a mantelpiece with their natural elegance. Beyond their stunning appearance, these garlands offer a subtle, natural citrus fragrance that gently perfumes your home, creating a cozy and welcoming atmosphere without artificial scents.
This sustainable craft project embodies the spirit of the winter holiday season and brings a touch of natural beauty into any home. It's an accessible DIY endeavor that can be enjoyed by crafters of all ages, making it a wonderful tradition to share with family. The versatility of dried orange slices extends beyond garlands; they can be incorporated into wreaths, potpourri, gift tags, or even cocktail garnishes. If you're ready to learn how to
craft beautiful dried orange garlands for natural holiday decor, understanding the drying process is your first step.
Oven vs. Dehydrator: The Quest for Brighter Slices
The fundamental difference in outcome between oven-dried and dehydrator-dried oranges boils down to temperature and control. Both methods achieve the goal of drying the fruit, but only one consistently delivers those coveted bright, vibrant slices that truly make a `dried orange garland` shine.
The Oven Method: Speed with a Rustic Touch
Drying oranges in the oven is generally the faster option, often requiring just a few hours compared to the dehydrator's longer process. However, this speed comes with a significant trade-off: a higher risk of browning or even burning your orange slices. Even at the lowest temperature settings, the ambient heat inside an oven is typically higher and less controlled than a dehydrator. This can cause the natural sugars in the oranges to caramelize more quickly, leading to a darker, more rustic, and distinctly browner appearance.
While these darker slices certainly possess their own charm and lend themselves beautifully to a warm, traditional, or rustic `dried orange garland`, they won't achieve that luminous, almost translucent quality that brighter slices offer. Achieving an even dry in the oven also demands constant vigilance, requiring you to carefully flip the slices every hour or so to prevent one side from overcooking. For those prioritizing speed and a warm, autumnal aesthetic, the oven can be a viable choice, but be prepared for a browner result.
The Dehydrator Method: Unlocking Radiant Brightness
If your primary goal is to achieve the lightest, brightest, and most naturally colored dried orange slices for your `dried orange garland`, a food dehydrator is undoubtedly the superior choice. Dehydrators are specifically designed to remove moisture slowly and evenly at consistently low temperatures, typically ranging from 115°F to 140°F (46°C to 60°C). This gentle, prolonged drying process prevents the rapid caramelization of sugars, allowing the orange's natural vibrant color to be largely preserved. The result is slices that are remarkably close to their raw natural color, possessing a stunning translucence that catches and reflects light beautifully.
While the dehydrator method takes considerably longer – often 6 to 12 hours or even more, depending on your machine and slice thickness – it offers unparalleled convenience. It's largely a "set it and forget it" process, requiring minimal oversight once started. This hands-off approach makes it perfect for busy crafters. Furthermore, starting with brighter slices means your `dried orange garland` will maintain its visual appeal for a longer duration, as all dried fruit naturally darkens slightly over time. With dehydrator-dried slices, your garland can last beautifully for several years. For a comprehensive deep dive into each method, explore our
DIY Dried Orange Garland: Oven vs. Dehydrator Guide.
Mastering the Drying Process: Step-by-Step Guide
Regardless of your chosen drying method, proper preparation is paramount to achieving beautiful, evenly dried orange slices for your `dried orange garland`.
Essential Preparation for Perfect Slices
1.
Select Your Oranges: Choose firm, unblemished oranges. Varieties like navel or blood oranges work wonderfully, with blood oranges offering a unique reddish hue. Give them a thorough wash and dry.
2.
Slice Evenly: This is arguably the most crucial step. Using a very sharp knife, cut your oranges into thin, even slices, approximately 1/8 to 1/4 inch thick. Aim for consistent thickness across all slices to ensure they dry at the same rate. Cutting them across the "equator" (the middle of the orange, not top-to-bottom) will reveal that classic, appealing cross-section.
3.
Blot Excess Moisture: Lay the orange slices in a single layer on a clean, lint-free cloth towel or several layers of paper towels. Place another towel on top and gently press to blot away as much excess moisture as possible. *Do not smash them.* Repeat this process if necessary. Removing maximum surface moisture helps speed up the drying process and reduces the risk of browning.
4.
Arrange for Drying: Transfer the blotted orange slices to your chosen drying surface – either baking sheets lined with parchment paper for the oven method, or directly onto your food dehydrator trays. Ensure the slices are in a single layer and do not overlap to allow for even air circulation.
Oven Drying Techniques for Optimal Results
If you're using the oven, even for a slightly darker, rustic garland, follow these steps carefully:
*
Temperature Sweet Spot: Preheat your oven to a low temperature, ideally between 200°F and 225°F (93°C to 107°C). Many crafters find 215°F (102°C) to be a good balance for their ovens – 200°F might take too long, while 225°F can accelerate browning.
*
Baking Setup: Arrange your single layer of orange slices on baking sheets lined with parchment paper.
*
Promote Airflow: To help moisture escape and prevent the oranges from "baking" instead of drying, slightly crack open your oven door (even just an inch) using a wooden spoon or heat-proof object.
*
Flip and Monitor: Dry for 3 to 5 hours, but this time can vary greatly depending on your oven and slice thickness. *Crucially, flip the orange slices every hour or so* to ensure even drying on both sides and prevent them from sticking or over-browning on one side.
*
Check for Doneness: Slices are done when they are dry to the touch, firm, and no longer sticky or pliable. They should feel leathery and not brittle (unless you prefer them that way).
*
Cool Down: Once dried, transfer the orange slices to a wire cooling rack to cool completely before handling or assembling.
Dehydrator Drying for Consistent Brilliance
For those seeking the brightest, most natural hues:
*
Temperature Setting: Set your food dehydrator to a low temperature, typically around 135°F (57°C). Consult your dehydrator's manual for optimal fruit drying temperatures.
*
Tray Arrangement: Arrange your prepared orange slices in a single layer on the dehydrator trays, ensuring no slices are overlapping.
*
Set and Forget (Mostly): The beauty of the dehydrator is its hands-off nature. While you don't need to flip them constantly, an occasional check (every few hours) won't hurt, especially towards the end of the drying cycle.
*
Drying Time: Drying time will vary significantly, usually ranging from 6 to 12 hours, but potentially longer for thicker slices or high-humidity environments.
*
Assess Dryness: Slices are ready when they are firm, dry, and no longer flexible or sticky. They should have a slightly leathery texture but feel completely dry.
*
Cool and Store: Once dried, allow the slices to cool completely on the dehydrator trays or a wire rack before assembling your `dried orange garland` or storing them.
Beyond the Drying: Assembling, Displaying, and Storing Your Garland
Once your orange slices are perfectly dried to your desired brightness and texture, the fun of assembly begins!
Assembling Your Dried Orange Garland
You'll need a long needle (a quilting or doll-making needle works well) and sturdy twine, fishing line, or rustic jute string. Thread your chosen string through the needle. Carefully pierce each orange slice through the pith (the white part in the middle), or just above/below it, to prevent tearing. You can string them close together for a fuller look or space them out. For added visual interest and fragrance, consider interspersing your orange slices with other natural elements like dried bay leaves, cinnamon sticks, whole star anise, cranberries, or wooden beads.
Creative Display Ideas
The beauty of a `dried orange garland` lies in its versatility.
*
Window Displays: Strung across a sunny window, they truly come alive, catching the light like glowing ornaments.
*
Christmas Tree: Drape them amongst the branches of your Christmas tree for a charming, natural touch.
*
Mantels & Doorways: Adorn a fireplace mantel, frame a doorway, or accent a bookshelf.
*
Table Centerpieces: Lay a short garland along a festive dining table or weave it through other decor.
*
Gift Embellishments: Use individual slices or mini-garlands as unique and fragrant gift tags.
Storage and Longevity
To make your `dried orange garland` last for several seasons, proper storage is key. Once completely cool and dry (any residual moisture will lead to mold), store your garland in an airtight container or a sealed Ziploc bag. Place it in a cool, dark, and dry location. Avoid humid environments, as moisture is the enemy of dried goods. While dehydrator-dried slices maintain their brightness longer, all dried fruit will naturally darken slightly over time. With good care, your beautifully crafted `dried orange garland` can be a cherished part of your holiday traditions for years to come.
Conclusion
Creating a beautiful `dried orange garland` is a rewarding endeavor that brings natural charm and delightful fragrance into your home. The decision between using an oven and a dehydrator hinges on your desired aesthetic and available time. While the oven offers a quicker path to a rustic, browner garland, the dehydrator stands as the undisputed champion for achieving those coveted bright, vibrant, and almost translucent orange slices. By carefully preparing your fruit and choosing the method that aligns with your vision, you can craft a stunning and long-lasting decoration that will be admired for seasons to come. Embrace the process, and enjoy the radiant beauty of your homemade dried orange creations!